


Creating a no-code web experiment
Contents
🚧 Note: No-code web experiments are currently considered in
beta. To access them, enable the feature preview in your PostHog account. You'll also need to definedisable_web_experiments: falsein your Posthog web snippet configuration.We are keen to gather as much feedback as possible so if you try this out please let us know. You can send feedback via the in-app support panel, or use one of our other support options.
Limitations and use cases
No-code experiments are great because they're quick to set up and require no coding, but it's important to understand their limitations and ensure they're the right fit for your website.
| Use case | Explanation |
|---|---|
| ✅ Simple layout changes | Small edits to text or basic formatting are easy to manage and less likely to break anything |
| ✅ Server-rendered web applications (e.g., Next.js) | Because the page doesn't typically re-render on the client, your changes are less likely to be overwritten |
| ❌ Complex changes or interactions | While possible, making multiple or intricate CSS and HTML modifications can introduce more risk and requires careful management |
| ❌ Single-page applications (e.g., React, Vue, Angular) | Frameworks that frequently re-render or replace DOM elements may overwrite any no-code changes you apply |
Building a new experiment
No-code web experiments enable you to run A/B tests, multivariate tests, and other experiments that modify your website without writing a single line of code.
You can build your web experiment directly in the PostHog toolbar, our no-code tool. Once you save your experiment in the toolbar, it automatically appears in PostHog where you can configure metrics, launch it, and track results.
In this example, we will change the text of a button on a sample webpage without writing any code.
1. Configure your PostHog snippet
Before creating your experiment, you'll need to add disable_web_experiments: false to your PostHog web snippet configuration. Otherwise, experiments configured with the toolbar won't run on your live site.
Add disable_web_experiments: false to your PostHog init code like this:
2. Launch the toolbar and create your experiment
After enabling the No code web experiments feature preview, launch the toolbar on your website:
- Go to the toolbar tab in PostHog.
- Add your website URL as an authorized domain if you haven't already.
- Click Launch to open the toolbar on your site.
Once on your site with the toolbar active:
- Click the Experiment tab on the toolbar.
- Click New experiment to create a new web experiment.
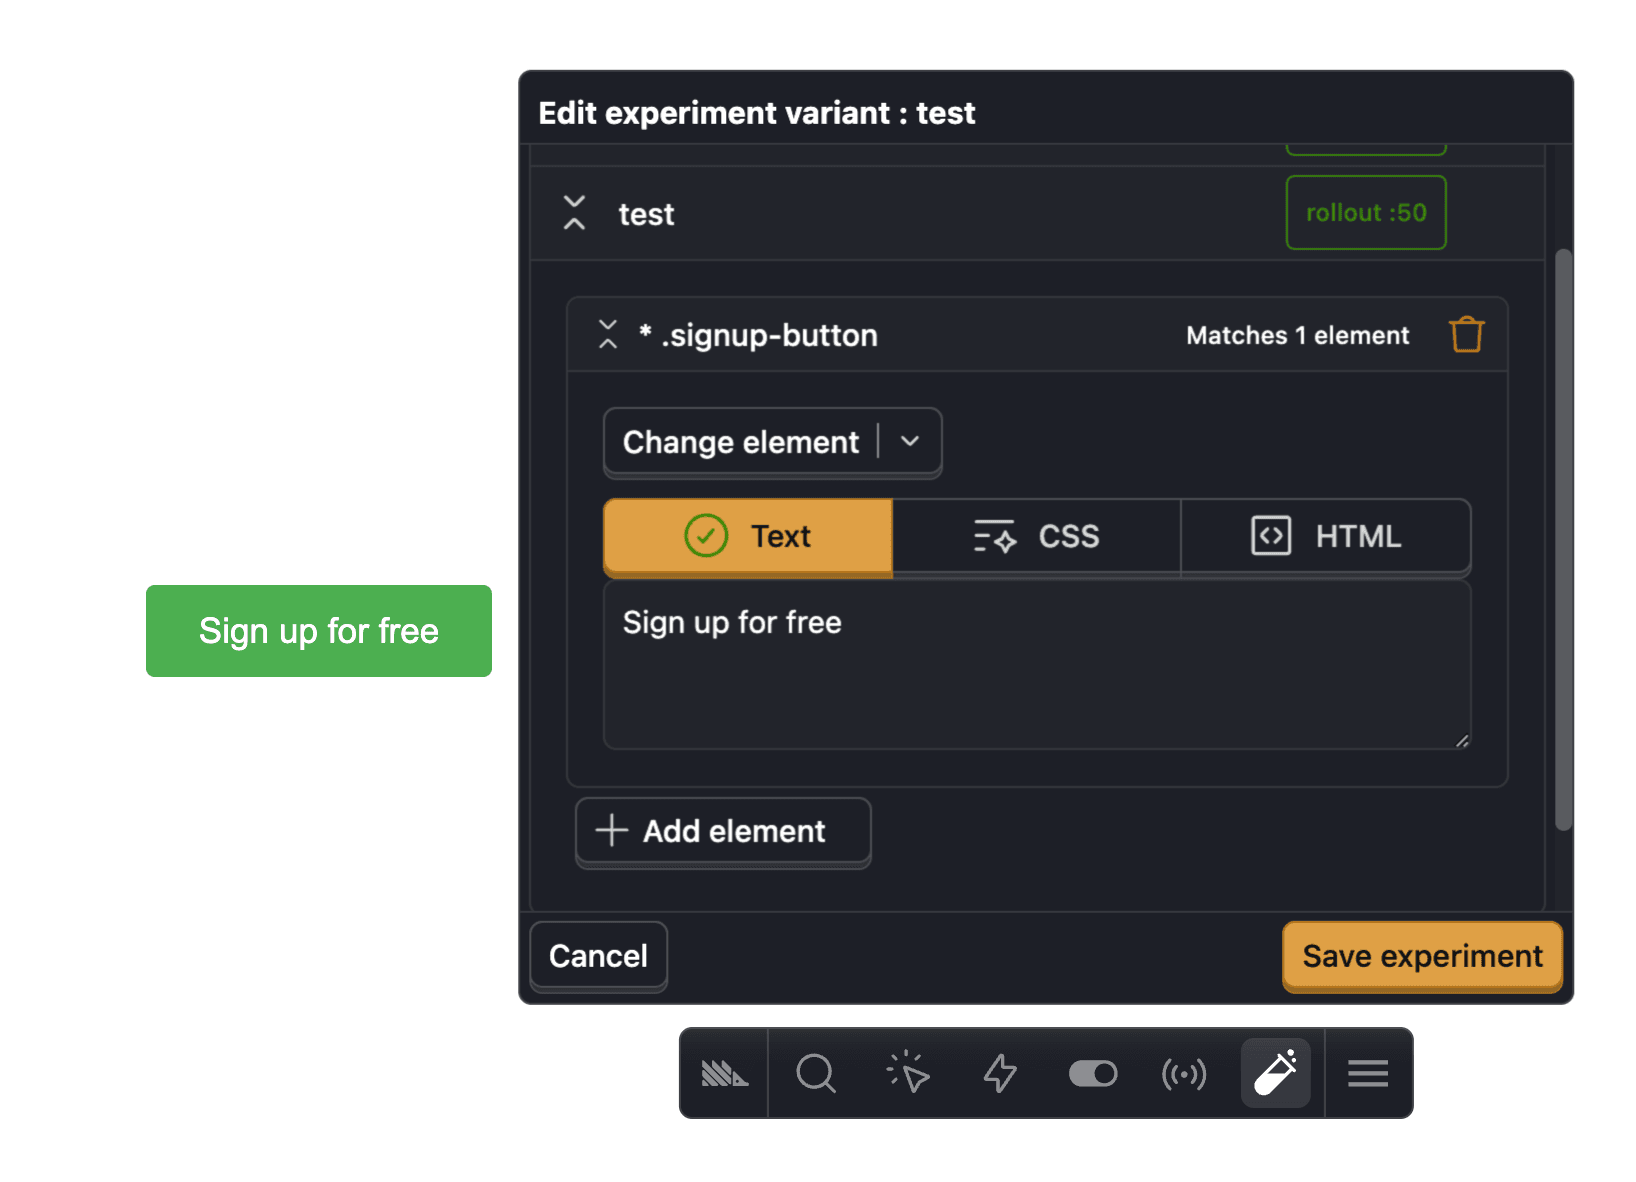
- Give your experiment a name and configure your variants.
- Select the variant of the experiment you want to modify. In our case, we select the test variant.
- Click Add element and select the element you want to modify. For example, you can select the main signup button on your page.
- Use the toolbar to modify the element's text, CSS, or HTML. We'll change the button's text to say "Sign up for free". Importantly, the Text field modifies the text of the element. The CSS field lets you change the styling of the element. The HTML field will override the entire element.
- If you'd like to change multiple parts of the page for this version of the experiment, click Add element to modify a second, third, or fourth element.
- Once done modifying elements for your variants, click Save experiment.
If you need to update an element such as a button shared by many pages, use a common CSS class selector. For example, to change the Sign up button:
- Add a common class such as
class="sign-up-button" - Select it using the
.sign-up-buttonCSS selector.
3. Configure and launch in PostHog
Once you save your experiment in the toolbar, it appears in the Experiments tab in PostHog. From there you can:
- Add primary and secondary metrics to measure results.
- Configure experiment parameters like exposure criteria.
- Preview your variants using the Variants tab.
- Launch your experiment when ready.
Product experiments use custom code to manage how variants modify your product. This option is best if you need specific, code-based adjustments and configurations.
Further editing your experiment
The toolbar also enables further editing of your experiment. For example, you can:
- Add multiple element changes to a variant by clicking + Add element. Elements are buttons, headers, images, and more.
- Remove an element from a variant by clicking the trash bin icon.
- Add more versions of your experiment by clicking + Add variant.
- Change all elements, headers, buttons, and/or images by clicking the Change element dropdown.
How to see how your experiment will look
To preview the different versions of your experiment, go back to your experiment details page in PostHog and click the Variants tab. Here, you'll see your variants along with a button to preview each of them (and the ability to add a screenshot for them).
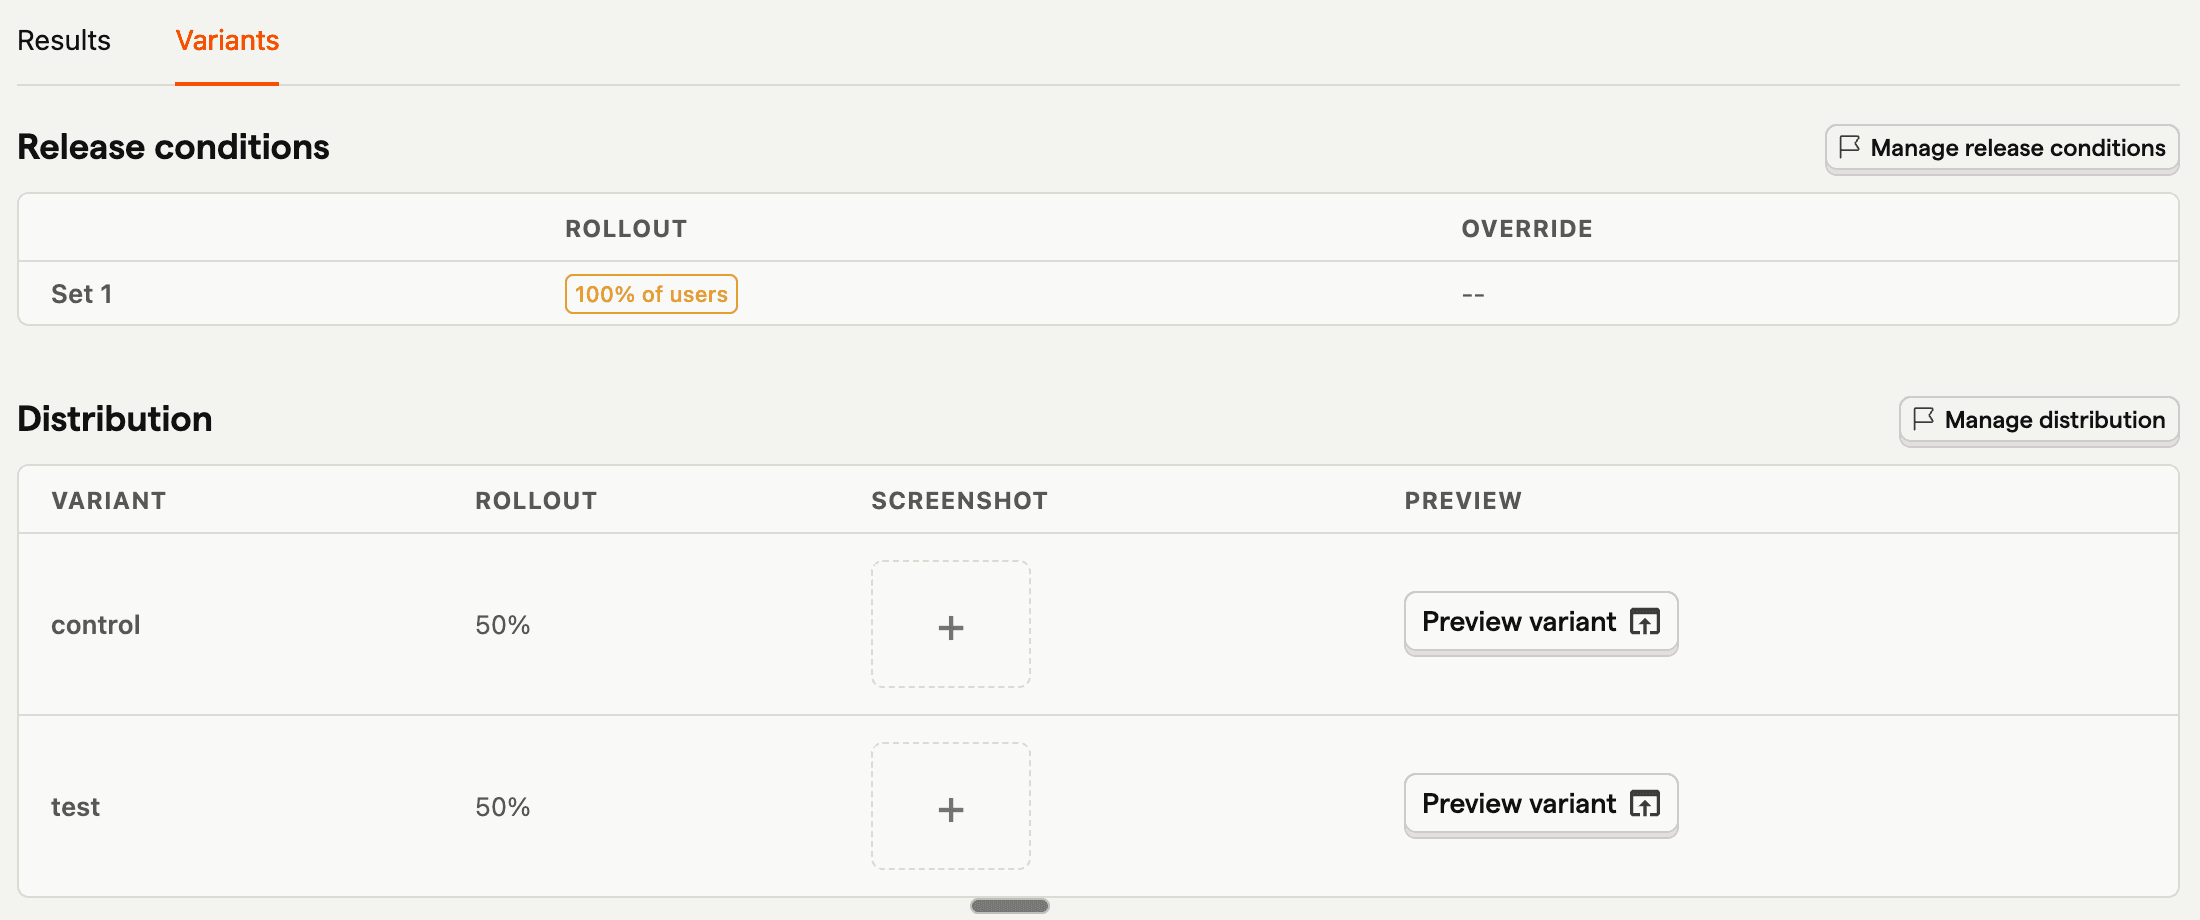
Doing this enables you to verify their configuration and ensure that the changes are displayed and functioning as expected before the experiment goes live.
Final touches
Congratulations! You're now ready to launch a web experiment.
Before launching, ensure the following:
Test thoroughly: Verify that all variants display and function as expected across devices and browsers. See our testing feature flags doc for more details.
Document changes: Record the modifications made to each variant and their goals. Add a description of the changes to your experiment as well as screenshots of each of the variants.
Troubleshooting and FAQs
Why am I seeing hydration errors during development?
If you're testing no-code experiments in development mode (e.g., Next.js), you may see hydration errors about browser plugins modifying the DOM. This is expected behavior since no-code experiments change HTML after the page loads, which frameworks like Next.js + Turbopack try to prevent to preserve server-side rendering.
These errors can be safely ignored as long as you're not implementing code that modifies HTML at build time. No-code experiments run on your live site after the static HTML is served, so they won't cause issues in production.
Why is there a delay before my element changes?
If you're evaluating the experiment flag on the same page where the element needs to change, you'll see a brief delay as PostHog loads and processes the experiment's feature flag.
To prevent that, evaluate the flag on a page before the one where you need the element to change. For the best user experience, evaluate the flag on the server and pass it to the frontend using feature flag bootstrapping.